Fausts Alptraum Game Walkthrough / Solutions and Completion Guide
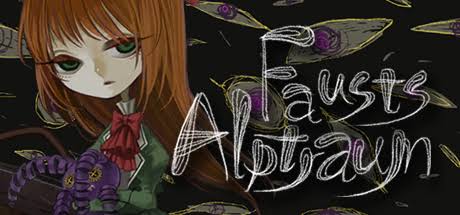
Fausts Alptraum Game Walkthrough / Solutions and Completion Guide
To finish the game, you will have to inspect everything written in bullet points.
For convenience’s sake, I will skip marking down where there are matches, chocolate, save points, or books that give no relevant information to solving puzzles (they might, though, give relevant information to understanding the story). It is worth it to inspect every drawer and bookcase for these.
Characters will only be specified if they have a profile on the site.
1F: 1st floor. 2F: 2nd floor. B1: basement 1, and so on.
Prologue (Chapter 1)
New characters: Heinrich Faust. Elisabeth Faust. Mephistopheles.
2F.
Elisabeth’s room. (Save point)
Wake up. Inspect room.
• Bookcase. On left side, game instructions:
– Move: arrow keys
– Confirm or inspect items: Enter/Space/C
– Cancel or back: Esc/X
– Menu: Esc
– Pressing Alt+Enter switches to full-screen mode.
– Chocolates will increase walking speed, matches will increase line of sight. Keeping to a certain walking speed and sight radius will decrease the chances of danger.
– If the screen blacks out, you will return to your bed. This does not mean you died, and what has already happened does not need to be repeated.
– Some items can be worn.
– The cat will give you some clue by reacting to specific items.
– If the screen is too dim, please increase screen brightness. Earphones are recommended for play as some puzzles are accompanied by music.
– Text that has already been read will appear in this bookcase.
• Bedside table. Retrieve “key for right corridor”.
• French doors. Locked.
• Table. On right side, paper and ink. You can make a record here. On left side, retrieve “matches and a candleholder”.
• (Menu) Rag doll.
Exit. Trigger event, meet Mephistopheles.
1F.
Hall.
Note: stepping on mice will decrease your range of vision/speed.
• Left corridor door. Locked.
• Small door to the right of stairwell. At the end of its corridor, there is a locked door. There is a keyhole with a widely open eye engraved.
• Right corridor door. Open with “key for right corridor”.
Enter right corridor.
Chapter 1: Puss in Boots
New characters: Siebel. Porkhyaden. Homunculus.
1F.
Right corridor.
Enter first door.
Dining room.
Enter door on the back.
Kitchen. (Save point)
• Dead fish. Retrieve “fish eye”. The prettiest facial feature is the eyes!
• On wall: some plates. They’re stored pretty high. These would make a ruckus if they fell!
• Cauldron. Its contents look like they could melt something.
• Door. Locked. Its window overlooks a pond and, on the other side, another window.
• Plaster sculpture.
• Furnace.
• On wall: “The witch’s sums”. There are missing wooden pieces.
Exit kitchen.
Dining room.
• Plaster sculpture.
Exit dining room.
Right corridor.
• Plaster sculpture. Retrieve “metal wire”.
Escape plaster sculpture by exiting and reentering corridor.
Use “metal wire” to unblock second door. Retrieve “living room key”. Use key to open door.
Living room. (Save point)
• Table. Read “Puss in Boots I”.
Follow Siebel the cat, exit the living room.
Right corridor.
Retrieve “key on the floor”.
Living room.
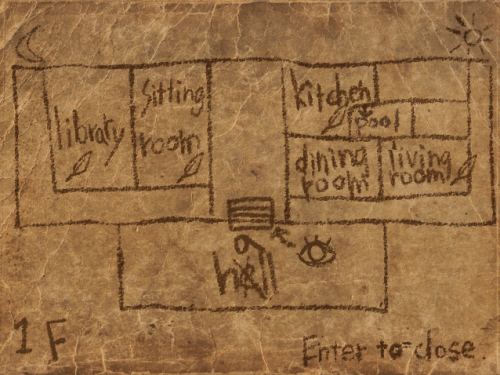
• Left bookcase. On the right side, retrieve “map”. The top right end has sun, and the top right end has a moon.
• On wall: empty hook. Maybe you could hang another painting here.
• Window. Locked. It overlooks a pond and, on the other side, a door with a window.
• Top left corner drawer. Photo frame. Retrieve “note”. Letters and numbers are written in color ink.
• Small table beside save point:
Q. Mary was an apple girl. She was going to give an apple to her hungry cat at home, but bumped into a starving mouse along the way. Although she really wanted to give the apple to the cat, she couldn’t let the mouse stay hungry. What should she do?
.
.
.
.
.
A. Give it to the mouse. (Mary is an apple girl)
Retrieve “golden key”. It seems to have a thick layer of paint on it. Maybe something could melt the paint…
Exit living room.
Kitchen.
Dunk “golden key” in a cauldron. Retrieve “iron key”. Exit kitchen.
Right corridor.
• Display Room. Locked.
• Piano Room. Can enter but will immediately exit; afterwards locked.
• End of corridor door. Locked. It is daytime outside the window.
Exit right corridor.
Hall.
Use “key on the floor” to open the left corridor. Enter left corridor.
Left corridor.
• First door.
Q. “A sparkling interior shines but for a moment, only internal beauty will endure throughout the ages”.
.
.
.
.
.
A. Use gold-turned-iron key to unlock.
Sitting room. (Save point)
Bottom part of the room.
• Table. Spilled inks mix to make new colors.
• Drawers. On left side, retrieve “map of 2nd floor”.
• On wall: sheet with added letters.
• Small closet. Four numbers to open; follow three hints:
Q. 0 0 0 0
H1. Mixed inks.
H2. Colored letter / number note.
H3. Sheet on wall.
.
.
.
.
.
A. A=red, B=blue, C=yellow, K=black.
1=purple, 2=green, 3=orange, 4=black.
B+C=2; B+K=4; A+K=4; A+B=1.
2 4 4 1
Retrieve “small key”.
Top part of the room.
• Clock. It has no hands to mark hours.
• Table. Read “Puss in Boots II”.
Siebel joins. Exit sitting room.
Left corridor.
• Second door. Locked.
• Painting beside second door. A queen with a high wig.
• End of corridor door. Locked. It is night time outside the window.
Exit left corridor.
2F.
Elisabeth’s room. (right corridor, second door)
Use “small key” to open French doors. Exit. Trigger event. Enter rooms on right or left side of Elisabeth’s from the veranda, and then unlock their front door from inside:
Three pigs’ room. (right)
• Furnace. There is a small flame. Maybe at a latter time it can be lighted.
• Doll. It is over a safety deposit box. It is a featurless cloth doll. Maybe its features could be carved.
• Table. Retrieve “bookmark”. It lists organ prices.
Hole room. (left)
• Safety deposit box. Locked. “Start with the most expensive”. Prices?
• Cracks in floorboard beside chimney.
• Table. Read “Puss in Boots III”.
Exit either room.
Right corridor.
• First door. Locked. Trigger event with Porkhyaden. Apparently you’d have to be nicely dressed to enter…
• Second door. Locked. “Opening hours: 4:00.” Where can we figure out the time?
Glass of painting by second door will break when Elisabeth walks by. Touching the glass will send her back to her room.
• Drawer at end of corridor. On right side, retrieve “clock hand”. There was somewhere it could belong…
Go down.
1F.
Sitting room.
Place hour hand on clock at 4:00 mark. Exit sitting room.
2F.
Right corridor.
• Second door opens at 4:00.
Gallery.
Enter door on back.
Marguerite’s room. (Save point)
• Table. Read “Bound book I”. Trigger event. Siebel leaves.
• Bookcase. Read “Bound book II”. Retrieve “wooden handle key”.
Open redwood cabinet with “wooden handle key”. Retrieve and change into “formal dress”. Would this do as a nicer dress?
Retrieve “paper fragment” from the floor. Numbers from 1 to 4 go from the top left to the top right.
Read “Bound book III”. Exit room. When going down the gallery, avoid rolling plaster sculpture head by moving to the side.
Right corridor.
• First door. Seems a pretty dress won’t do. Need something cool and pretty.
Hole room.
• Safety deposit box. Four numbers to open; follow two hints:
Q. 0 0 0 0
H1. Bookmark with organ prices.
H2. Newspaper fragment with ordered numbers and organ illustrations.
.
.
.
.
.
A. The pattern is always 1, 2, 3, 4, without repeating, from left to right and going back from the left if 1 is positioned later in the row.
1, 2, 3, 4 //
(3), 4 // (1), 2
(4) // 1, (2), 3
2, 3, 4 // 1
3=Heart; 1=Tooth; 4=Eyes; 2=Blood.
Priciest to cheapest: Heart (3), Eyes (4), Tooth (1), Blood (2).
3 4 1 2
Retrieve “spade”. A spade is for gardening. Might be able to dig up soft dirt.
Read “Bound book IV”. Something was left by a pond.
Exit room.
1F.
Right corridor.
The door to the dining room is open.
Dining room.
The door to the kitchen is open.
Kitchen.
Retrieve “plate fragments”. These are pretty sharp. They could tear through cloth.
Exit kitchen.
2F.
Three pigs’ room.
Use “plate fragments” to tear a mouth for cloth doll. Use “fish eye” to give it some features. Retrieve “painting”. Where can it be hung?
Retrieve “fish eye”.
Exit room.
1F.
Living room.
Hang “painting” on empty hook. A door can be heard opening. Look through window. Door is on the other side. Exit living room.
Kitchen.
The door with a window is open.
Pool.
• Flowers in pot. Bugs seem to approach fresh flowers.
Use “spade” to dig on disturbed soil beside fountain. Retrieve “yellow gem”. Isn’t it rather pretty and cool?
Retrieve “bracelet”. It has bells and a name. Don’t cats use that?
Read “Puss in Boots IV”.
Exit pool.
2F.
Right corridor.
• First door. Present “yellow gem” to open door. Trigger event. A game of hide and seek will begin. You must find three piglets all throughout the game.
Waiting room.
Retrieve “yellow gem”. Read and retrieve “Old Diary I”.
• Data Room. Locked.
• Unlighted candleholder. The match is too short to reach it.
• Door. Not locked, but won’t open.
• Drawers. On left side, retrieve “handaxe”.
Exit room. Siebel joins.
Hole room.
Use “handaxe” to open the crack on the floor beside the furnace. Go down hole.
Library. (Save point)
There is an empty bookcase with papers on top. Push it together with the rightmost bookcase from the middle row. Read and retrieve “Old Diary II”. Music will start playing.
• Third bookcase from top left. On left side, hint of the witch’s sums. All make 15. On left side, something shiny will trigger event. Siebel leaves. Now the key is too high to reach either way. If only someone could jump up there.
Exit library. It will lead to a “known” place.
???
As you walk along hall, music will get louder. At the end, there is a save point. Make sure to save.
Crossing the door is a maze of desks. A desk can be pushed if there is no other desk in front, behind, or to the sides of it. There are several ways to get to the end.
Read “Memo I” and cross the door. There is another save point. Make sure to save.
A darkened maze. There is no danger in crossing, but it will be blocked at parts.
.
.
.
.
.
Steps: 2↑, 2←, 1↑, 3←, 4↑, 5→, 1↓, 2→, 3↓, 1→, 1↓, 3→, 1↓, 2→, 2↑, 1←, 3↑, 2←, 1↑.
Read “Memo II” and cross the door. There is another save point. Make sure to save (for real).
Read “Memo III” and (if possible) cross the door. As long as it has been read, entering again will automatically skip the room.
Read “Memo IV” and “List”. Trigger event.
2F.
Elisabeth’s room.
Wake up. Siebel joins. Trigger event. Put “bracelet” on Siebel. Retrieve “key with a label” from close to door. Exit room.
Marguerite’s room.
• Chair beside window. A tail is peeking out. Trigger event.
Exit room.
Waiting room.
Use “key with a label” to open Data Room.
Data Room. (Save point)
• Bookcase on top left. On right side, read “How to Create a Golem”. Some powerful words are mentioned.
• Table to right of first bookcase. Read “The Blue Bird I”.
• Painting to right of second bookcase. It is locked to the wall.
• Third bookcase. On left, there is space for a book. Insert “old diary”. Painting will unlock. Retrieve “sun-shaped key”. There was a sun somewhere on a map…
Retrieve “umbrella”. Where would it be raining inside?
• Table on top right. Read “Letter”.
• Small table between two bookcases at the bottom. Retrieve “long match”. There was a candleholder that needed lighting up.
Exit room.
Waiting room.
Use “long match” to the light candle holder.
Mirror room.
Enter. Trigger event with Homunculus.
• Large center mirror. There is a keyhole with an almost open eye engraved.
• Mirror to the left of the center mirror.
Exit room.
(*If Siebel was not with you yet, Siebel joins.)
1F.
Library.
• (Optional for Secret Ending) Third bookcase from top left. Retrieve “small key” with Siebel’s help. Exit library.
Left corridor.
• Painting beside library door. Queen. A rather gaudy one with a tall white wig.
* There are some very obvious footprints which lead to a crack in the wall. It can be opened, but it is not necessary to conclude Chapter 1, so it will be explained when it is useful.
Kitchen.
• Furnace. A tail is peeking out. Trigger event.
Right corridor.
Use “sun-shaped key” to open door on the end. It is raining, so return inside. Equip “umbrella” to exit.
Greenhouse.
Greenhouse South East.
Walk straight ahead to the next section.
Greenhouse East. (Save point)
Save. This concludes Chapter 1.
Maps at Chapter 1 Conclusion
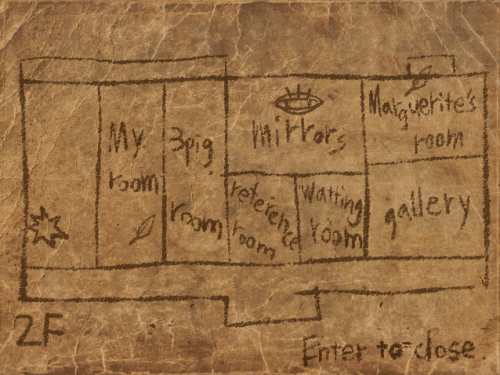
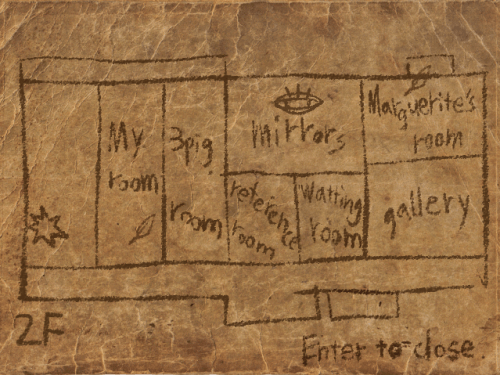
Hole room = unlabeled leftmost room
Mirror room = Mirrors
Data Room = Reference room
Items at Chapter 1 conclusion
• Rag doll
• Original dress
• 1F map
• Formal dress
• Iron key
• Yellow jewel
• Small spade
• 2F map
• Fisheye
• Chocolate
• Matches
• (Optional) “Right Hand” label key
Books at Chapter 1 conclusion
• Instructions
• Puss in Boots I
• Puss in Boots II
• Puss in Boots III
• Puss in Boots IV
• Bound book I
• Bound book II
• Bound book III
• Bound book IV
• Old Diary I
• Old Diary II
• Memo I
• Memo II
• Memo III
• Memo IV
• List
• The Blue Bird I
• Letter
Chapter 2: The Blue Bird
New characters: Valentin
Greenhouse.
Greenhouse E.
Previous save point. Go down and to the left.
Greenhouse S.
Trigger event with Valentin. Retrieve “forgotten key”. Go right.
Greenhouse SE.
• Closest sign is a map. Cannot cross from E to C; from W to C there is a river. In C there is a bird. In NW there is a red cross. In N there is a bear.
• Construction notice. There is a third floor. There is a crack in the 1F left corridor. There’s a drainage issue in the bathroom. There is something on the pink carpet on the third floor.
Go up.
Greenhouse E. (Save point)
• Empty pot. It may still be used.
• Blue flowers. There are several kinds.
• Blue rose bud. Maybe with a little watering, it would blossom?
Retrieve “clay-made hand”. It is holding something…
• Sign on corner. It has four quadrants. There is a different flower in each quadrant.
• Chest beside sign. Four numbers to open; follow two hints:
Q. 0 0 0 0
H1. Four quadrants / flowers on sign on corner.
H2. Hint on chest asking for amounts on coordinates.
.
.
.
.
.
A. (3,5)=top right quadrant, single flower with three leaves; (-1,-1)=bottom left quadrant, four flowers with three leaves; (-1,5)=bottom right quadrant, single five petal flower; (3,-2)=top left quadrant, single lily.
The numbers are the amount of each kind of flower on each quadrant in the order of the clue:
3 3 6 1
Retrieve “seed”. Plant “seed” in pot. Retrieve “vase”. Retrieve “small key”. Optionally, save before proceeding.
Go up.
Greenhouse NE.
• Blue feather.
• Tree.
• Desk. Read “Bound book V”. Trigger event*. Siebel leaves.
(*You may only choose one option. If you saved before, you can return to the save point by going Menu>Exit>Back to title>Load and choosing your greenhouse save file. This can also be done at any time, as long as you can visit the greenhouse during the day.)
Go down and left.
Greenhouse C (right).
Cannot cross, but there is a wild blue bird on the other side.
Go right, down twice, left twice, up twice.
Greenhouse W.
• Iron gate. “Hours of operation: Midnight.” There have been other doors with operation hours… but midnight can certainly not happen in a sunlit greenhouse, can it?
• Pigeons. Talk to every one of them.
• Table with a slot. Insert “clay-made hand”.
• Table with hand. It can be rotated.
Q. Hand rotation. Five hints:
H1. A total of nine turns are needed.
H2. First to the right.
H3. Three total turns to the left.
H4. Turns to the right decrease by one each time.
H5. Turns to the left are always preceded by multiple turns to the right, until the final left turn.
.
.
.
.
.
A. Work backwards.
9th=left.
8th=right.
7th=left (the right turn before the final left turn is not multiple).
6th=right,
5th=right (the right turns decrease by one each time and are multiple until the last).
4th=left.
3rd=right,
2nd=right,
1st=right.
3→, 1←, 2→, 1←, 1→, 1←.
Retrieve “wing”.
Go right.
Greenhouse C (left).
Cannot cross. The river below has some planks. Maybe if the water level were higher, they could be used as a bridge.
Go down.
Greenhouse SW.
• The door back in is identical, but it is locked. It is marked on the map with a moon.
Go back in through the unlocked door.
1F.
Left corridor.
Follow footprints. Use “handaxe” to open crack on wall. Go in.
Inside the hole. (Save point)
Use “forgotten key” to open the door. Make sure to save before entering.
Hole room.
Stepping into the dark will send Elisabeth back to the bed in the previous room.
• Clay statue. Can be written on. A book about golems had powerful words recorded…
Q. 1-5 character word.
.
.
.
.
.
A. “Emeth”, truth.
Memorize the golem’s path.
Starting from where the golem stands: 3↓, 5→, 3↓, 2→, 1↑, 1→, 1↑, 3→, 4↑, 3→, 4↓, 2→.
Starting from where Elisabeth stands: 1→, 1↓, 5→, 3↓, 2→, 1↑, 1→, 1↑, 3→, 4↑, 3→, 4↓, 2→.
Basement 1.
Secret base SW.
Go right.
Secret base SE.
Read “Bound book VI”. Go left.
Secret base SW.
Go up and left. Enter hole. Read “The Blue Bird II”.
Use “small key” with “Water Gates” label to unlock three-stage switch. A river could be crossed with higher waters.
Exit hole, go right, up, and right. Enter hole.
Greenhouse C (left).
• (Optional) Glowing item. Too far and deep in water to retrieve. If Siebel were there…
Enter.
Greenhouse N.
Follow the door and press Enter key to enter.
Door.
Follow the direction of blue arrows.
• Blue feather.
Secret base SE.
Wake up. Return to where you last were.
Secret base N. (Save point, later)
Go down stairs. Trigger cutscene. Go left, birds will fall. Some are hung upright and some upside down, facing both sides.
Go left.
• Door. Locked. “Only bring gold here!” Wasn’t there a door that said the opposite?
• Sign: Wine cellar.
Go right and down.
• Golem. It is blocking the way.
Q. 1-5 character word.
.
.
.
.
.
A. “Meth”, death.
Go in the hole. (Save point) Siebel joins.
• First bookcase from left. On left side, read about animal blood. Animal blood is nutritious… Some are more valuable than other. On right side, books “The Boy Who Cried Wolf” and “The fox and hens”. All stories about animals.
• Second bookcase from left. On right side, read about pig blood. It seems animal blood can be consumed by humans.
• Desk. Read “Bound book VII”.
Retrieve “bird catcher”. There was a wild bird roaming about…
Exit hole. Go to bottom right corner.
• Door. Locked. ↓ ↓ ↓ symbol on its keyhole.
Go up.
• Door with bird carving. Four numbers to open; follow two hints:
Q. 0 0 0 0
H1. “Head: up down left right”
H2. Hanging birds.
.
.
.
.
.
A. Look at the heads.
Three face up, two face down; three face left, two face right.
3 2 3 2
Bird room.
• Dinner plate. Its lid cannot be lifted.
• Wolf picture.
• Human picture.
• Fox picture.
Retrieve “wine glass” x3. Remember they are borrowed.
Exit.
Secret base C (left).
• (Optional) Glowing item. Too far to retrieve. Cats don’t like water.
Secret base SW.
(Optional) Go into switch hole. Pull switch down.
Secret base C (left).
• (Optional) Retrieve “small key” with Siebel’s help.
Secret base SW.
Go into switch hole. Pull switch up.
1F.
Greenhouse.
Greenhouse C (left).
Cross river.
Greenhouse C (right).
The blue bird is gone. Place “bird catcher” and leave.
Greenhouse C (left).
When leaving, there will be a bird noise. Return.
Greenhouse C (right).
Retrieve “moon-shaped key”.
Greenhouse SW.
Use “moon-shaped key” to open door.
1F.
Sitting room.
Adjust clock hands to 12. Exit.
Left corridor.
Exit through to greenhouse through door opened with “moon-shaped key”.
Greenhouse (night).
Greenhouse W.
• Bed. Read “The Blue Bird III”.
• Gates. They should have opened, since it’s 12.
Greenhouse NW.
Follow the door and press Enter key to enter.
Door.
Q. “Have you heard?”
.
.
.
.
.
H1. This is an audio puzzle. Walk in the direction of the sighs.
.
.
.
.
.
H2. The male voices are up and down. The female voices are left and right.
H3. The top left and bottom right quadrants represent the male voices; the top right and bottom left quadrants represent the female voices. You will “follow” the voices according to their moods.
.
.
.
.
.
A. Sighing man ↑; crying man↓; laughing woman→; crying woman←.
1↑, 1←, 1→, 1←, 1↓, 1→, 1↑, 1→, 3↓.
• Blue feather.
Greenhouse (night).
Greenhouse W.
Wake up.
Greenhouse NW.
• Table. Read “Bound book VIII”.
• Can of gold paint. Dunk “iron key” in it. Retrieve “gold key”.
• Vase. It is empty. Another blue rose might go well here.
• Bright red flowers in the middle of orange flower beds. (Middle flower bush in middle flower planter). Use “small spade” to dig up. Retrieve “red gem”.
Greenhouse N.
• Flowers. There are bugs flying around. Reminder: bugs approach fresh flowers.
• Sign beside door: “One can be found on you, one is buried beneath the unsociable hand, one is buried beneath the red X, one is located in the hallway behind Marie Antoinette.”
Greenhouse S.
• Sign: “Someone was always antisocial”.
• There is only one left hand. (Middle row hand in right flower planter). Use “small spade” to dig up. Retrieve “blue gem”.
Greenhouse E.
Retrieve “watering can”.
• Rose bud. It is the only blue flower remaining. Maybe with some care it could blossom.
Read “Astrology and Life II”. The wheel of fortune’s elements, from the top clockwise, are earth, wind, fire, and water.
Greenhouse NE.
• Graves. Only one is missing flowers.
1F.
Left corridor.
• Queen portrait beside library door. Retrieve “green gem”.
Secret base SW.
Go right, up, and right. Use water from flooded hole to fill “watering can”.
Go into switch hole. Pull switch up. Go out and enter now unflooded hole.
Secret base N.
Use “gold key” to open wine cellar.
Wine cellar.
• Wooden box on the left. Trigger event. Retrieve “crayon”. It’s your turn to be found.
• Barrels. “Dog”, “Goat”*, “Bucks”, “Bull”, “Snake”, “Chicken”.
(* Translation issue here: should be “Sheep”. It has been reported and could be fixed in new patches of the game.)
Three glasses had been borrowed before, it’s time to return them.
Q. Which wine would everyone want to drink?
H1. Blood could be consumed by humans and one is highly valued by hunters.
H2. “The Boy Who Cried Wolf”
H3. “The fox and hens”
.
.
.
.
.
A. Hunter = “bucks” (deer). Wolf = “goat” (sheep). Fox = “chicken” (hens).
Use each “wine glass” to fill with content from the barrel. Exit room.
Bird room.
Return each glass to its corresponding table.
• Dinner plate. Retrieve “bird’s leg”.
1F.
Greenhouse (night).
Greenhouse E.
Use “watering can” to water “rose bud”. Retrieve “rose”.
Greenhouse NW.
Place “rose” in empty vase.
Greenhouse N.
• Flowers. Retrieve “white bouquet”.
Greenhouse NE.
Place “white bouquet” on “Me” grave. Retrieve “beak”.
Greenhouse E.
Optionally, save. (The next puzzle gives you a single attempt).
Greenhouse N.
Use gems to open door.
Q. A book seemed to talk about the wheel of fortune and its elements…
.
.
.
.
A. Read the description of each gem in your inventory. Red = “A fiery, red gem.” Yellow = “A jewel the color of the earth.” Green = “A clear, green gem.” Blue = “A watery, blue gem.”
Clockwise, starting from the top: yellow, green, red, blue. Open door.
Greenhouse C (right).
• Wooden box. It is locked.
• Teddy bear. Examine from different directions. It is missing a hand, a mouth, and an arm.
Use “wing”, “beak”, and “bird’s leg” to repair teddy bear. Retrieve “iron key”. It is shaped like a down arrow.
1F.
Secret base N.
Use “iron key” to open door with ↓↓↓ symbol. Go down.
• Table. Read note. Go left.
Secret base basement.
Trigger cutscene.
Read “The Blue Bird IV”. Go up.
1F.
Left corridor.
Follow music. Follow the door and press Enter key to enter.
Stained glass corridor.
Notice eyes follow you. Go up between the ones that don’t.
• Blue feather.
2F.
Elisabeth’s room.
Wake up. Follow voices. Exit room.
Left corridor.
Read “The Blue Bird V”. Keep on following voices.
Right corridor.
Keep on following voices. The door to the gallery is open.
Gallery.
Keep on following voices. The door to Marguerite’s room is open.
Marguerite’s room.
The doors to the veranda are open. Trigger event. Exit.
1F.
Greenhouse (day).
Greenhouse S.
Trigger event. Read “The Blue Bird VII”. Retrieve “coin”. Trigger event. Retrieve “key”. There is a third floor?
1F.
Hall.
• Clay cicada.
• Clay fox
Save at any saving point. This concludes Chapter 2.
Maps at Chapter 2 Conclusion
Hole room = unlabeled leftmost room
Mirror room = Mirrors
Data Room = Reference room
Items at Chapter 2 conclusion
• Rag doll
• Original dress
• Bathroom key
• 1F map
• Formal dress
• Red crayon
• 2F map
• Chocolate
• Matches
• Gold coin
• Fish eye
• (Optional “Left Hand” label key
• (Optional) “Right Hand” label key
Books at Chapter 2 conclusion
• Instructions
• Puss in Boots I
• Puss in Boots II
• Puss in Boots III
• Puss in Boots IV
• Puss in Boots V
• Bound book I
• Bound book II
• Bound book III
• Bound book IV
• Old Diary I
• Old Diary II
• Memo I
• Memo II
• Memo III
• Memo IV
• List
• The Blue Bird I
• The Blue Bird II
• The Blue Bird III
• The Blue Bird IV
• The Blue Bird V
• The Blue Bird VI
• Letter
• Bound book V
• Bound book VI
• Bound book VII
• Bound book VIII


